This is how you do it.
Looking for step-by-step instructions on how to complete tasks in Digital Banking? You've come to the right place.
New Digital Banking initial log-in
Step 1: Download the new Mobile App
For those logging in with a mobile device
The new Citizens Bank Mobile App is available in the App Store for iPhone® and iPad® and in Google Play for Android™. Search Citizens Bank-WI or just tap a button below to install the app today.


Step 2: Use your existing Digital Banking credentials
Log in using your existing user name and password. You will only be prompted to update your password if you haven't changed it recently.
Step 3: Enter your verification code
You'll be asked to provide a phone number (mobile number preferred) to receive a verification code via text or call.
Step 4: Complete the process
You'll be asked to accept a new user agreement. Mobile app users will also set up a 4-digit passcode plus an optional biometric option.
For step-by-step instructions, check out this short video, or see the log-in guides posted below.
Create an internal transfer
You can create one-time transfers, future-dated transfers, and recurring transfers between Citizens Bank accounts.
- Select an option.
- Select Transfers from the main menu, then select Make a transfer (above the calendar), or
- Select Transfer in the quick actions section of the dashboard.
- Select the account you want to transfer funds from, and then select an account for the destination (the 'To' account).
- Enter the transfer amount.
- Follow the steps for what you want to do:
|
I want to:
|
Steps: |
|---|---|
| Create a one-time, immediate transfer | Select Submit. |
| Create a one-time, scheduled (future-dated) transfer |
1. Select More options.
2. Leave Frequency set to the default 'Once'.
3. Select the Date field.
4. Select a date for the transfer if you want something other than 'Soonest available'.
5. Select Submit.
|
| Create a recurring transfer |
1. Select More options.
2. Change the Frequency field.
3. Select a date for the repeating transfer to start.
4. Select Submit.
|
TIP: If your transfer is an immediate, internal transfer, you can add a memo note by selecting More options and completing the Memo field.
Add an account for external transfers
Add accounts from other financial institutions to transfer money to and from those accounts.
- Select Transfers from the main menu.
- Select '+ External account' from the Transfers screen.
- When prompted for your password, enter it and select Submit.
- Complete the Account name, Routing no., Account no., and Account type fields on the Add external account screen. The 'Account name' is a title you choose to give the account.

- Select Submit.
- If the account is eligible to send inbound transfers, a message appears saying that two small deposits have been sent to the account and will arrive in 3-5 days.
- Select OK.
- Verify your deposit amounts to activate external transfers.
View statements or other documents
- From the Dashboard or Accounts section from the main menu, select an account.
- Select Documents.
- Select an account from the drop-down menu.
- Find the document you need, then select View in the View Details column.
- To enroll an account, select Sign Up/Changes from the top menu, then select the desired account(s) and Save Settings.
Set account alert preferences
- From the Dashboard or Accounts section from the main menu, select an account.
- Select Alert preferences.
- To set balance alerts, select '+Add alert' on the Balance tab, enter your desired amount, pick your notification method, then select Add alert.
- To set transaction alerts, select '+Add alert' on the Transaction tab, enter your desired transaction type and amount, pick your notification method, then select Add alert.
Add a new payee
Set up a new person or vendor to pay.
- Select Payments from the main menu.
- In the Payments section, select '+ New payee'.
- Select an option.
- Select Add a bill (to pay a company).
- Select Add a person (to pay an individual).
- Complete the fields to create a payee, then select Submit.
- When prompted for your password, enter it and select Submit.
The new payee appears on the Payments screen with a payee Details screen that appears when the payee is selected.
Change my account nickname
Call it like it is by giving your accounts names that make sense to you.
- Select an account from the Accounts section on the dashboard, from the Accounts screen, or from the Accounts section in the general Settings screen.
- If you're on the account detail screen, select Settings. If you're on the general Settings screen, select the institution and then select the specific account you want to manage settings for.
- Next to the account name, select Rename.
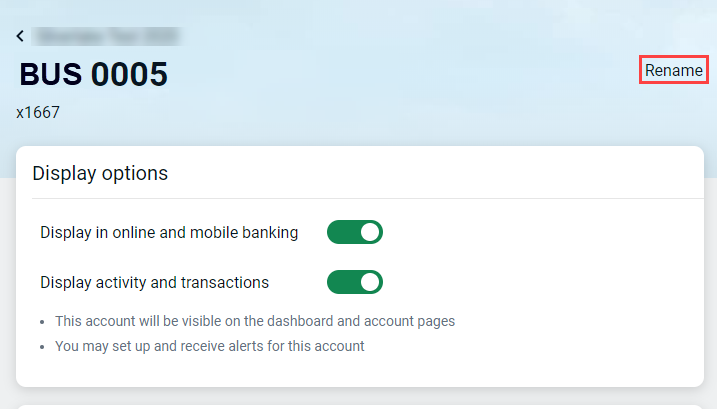
- Type the new name, and then select Save.
Enroll an account for remote deposit
Before using our new Mobile App to deposit checks, you'll need to enroll your account in remote deposit capture.
- If logged in online, select Remote deposits from the main menu. If using the Mobile App, select Deposit checks from the main menu.
- Select the appropriate account.
- Select Enroll.
Set debit card controls
- Scroll down on the Dashboard screen to the Card management section.
- Select the appropriate card you want to manage.
- To temporarily lock a card so it can't be used for transactions, select the green toggle button, then select Lock card.
- Select Alerts and protection to set alert preferences, spending limits, and restrictions based on location, merchant type, or transaction type.
Enroll in Zelle®
- From the dashboard or the main menu, select Send money with Zelle.
- Select Get started when the Zelle® welcome screen appears.
- When the Terms & conditions screen appears, select Accept & continue.
- Select the email or mobile number you wish to use as a token that is used by other Zelle® users to send money to you and to request money from you. If the email or phone number that appears from the bank profile are not desired, select + Add a new mobile number or email to enter a different one. NOTE: If a number or email has a pending transaction, that information appears in a message below it. You can select Yes, enroll this email or Yes, enroll this phone number to choose it to enroll with.
- When the list of eligible accounts appears, select a primary account to be used as the default account that money will be sent to and paid from.
- Select Continue. A verification code is sent in an email or a text, depending on the method of enrollment chosen (phone number or email).
- On the Validate information screen, enter the verification code that was sent to your email or phone number via SMS, and then select Verify.
- Upon successful validation of the code, the success screen appears to confirm enrollment.
- Select Send or request money to begin using Zelle®, or select View pending requests if there are any.